Wedding invitations
Wedding Place Cards: What They Are, How to Make Them & Ideas
Your seating plan is ready, the RSVPs are in, and you know who's sitting with whom. All that's left is the final touch that brings it all together at the venue: the place cards. These small cards are the difference between guests finding their seats smoothly after the ceremony and wandering between tables like they're at a train station. In this guide, we'll cover what place cards are, how to make them yourself, what to write on them, and where to find design inspiration.
What Are Wedding Place Cards and Why Use Them
A place card is a small card with a guest's name, set at their specific place setting. It tells them that this seat belongs to them. It's a small detail that accomplishes three things at once:
- It shows them their seat. A guest walks up to the table, sees their name, and sits down. No searching, no "so, where am I supposed to sit?".
- It organises the service. The catering staff knows who gets the vegetarian meal and who gets the gluten-free option because they know who is sitting where.
- It decorates the table. A well-designed place card is part of the overall styling—it complements the decorations, colours, and theme of your wedding.
Place cards are especially useful for weddings with 50 or more guests. For an intimate reception with 20 people, you can probably skip them—everyone knows each other and will find a seat on their own.
Place Cards vs. Seating Charts vs. Table Numbers
These three elements are often confused, but they have different functions and only work when used together:
- The seating chart is a large display at the entrance (or a digital version on a phone). It tells a guest: "You're at table number 5."
- Table numbers are the signs on the tables themselves—a number or a name that helps guests find the right one.
- The place card is the final step—at table number 5, it points to a specific chair for that person.
In other words: the chart directs them to the table, the number helps them find it, and the place card shows them their seat. If you're designing your layout from scratch, start with an online seating plan, and think of place cards as its physical extension on the table. You can read more about the art of seating arrangements in our post on how to seat guests at a wedding.
Types of Wedding Place Cards
Place cards come in several styles, from classic paper designs to modern solutions with QR codes. Your choice will depend on your wedding style, budget, and how much time you have to prepare them.
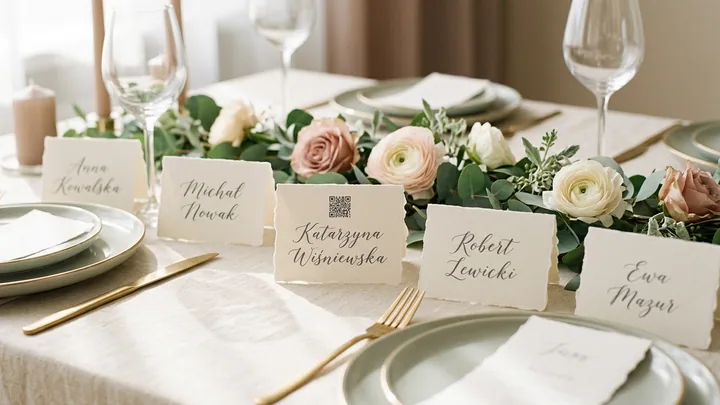
Classic Place Cards
The most popular option: a rectangular card made from thick paper, either folded into a "tent" or flat to be placed in a holder or on the plate. These are usually printed professionally along with your invitations and menus for a cohesive look. Pros: elegant, quick, and effortless. Cons: the cost adds up with more guests.
DIY Place Cards
Handmade cards using materials like handmade paper, cardstock, recycled cardboard, or even more unusual items. Pros: budget-friendly, unique, and you have full creative control. Cons: they're time-consuming, which can be a big job for 150 guests. They're a great fit for boho, rustic, or eco-friendly weddings. If you enjoy crafting, you can take a similar approach with DIY wedding invitations—it's always a good idea to stick to a consistent theme.
Unique Place Cards
Here, the only limit is your imagination. Guest names can be written on:
- pebbles or seashells (for a seaside or rustic wedding),
- leaves, olive sprigs, or dried flowers (boho, greenery),
- mini succulent pots (a place card and a wedding favour in one),
- gingerbread biscuits, chocolates, or small jars of honey (an edible or take-home place card),
- wine corks, wooden blocks, or pieces of fabric.
This type of place card serves a dual purpose: it shows guests their seat and acts as a small gift or favour.
Place Cards with a QR Code for Your Photo Gallery
An increasingly popular idea for modern weddings. Next to the guest's name, you place a small QR code that links to your photo gallery. When a guest sits down, they can scan the code with their phone and immediately know where to upload their pictures and where to view everyone's photos later. In souveil, your seating chart links to your RSVP list, and your place cards can include a QR code for the gallery. This way, one small card handles two tasks: seating your guest and inviting them to your shared album. It's convenient because guests don't need to install anything or create an account.
How to Make DIY Wedding Place Cards: A Step-by-Step Guide
DIY might sound like a big project, but with a bit of organisation, you can get it done in an evening. Here's a tried-and-tested method.
Materials You'll Need
- Paper or a base material — decorative cardstock (250–300 gsm), handmade paper, recycled cardboard, or your chosen unique material (pebbles, leaves, wood).
- Cutting tools — a paper guillotine or a craft knife and ruler (straight edges make all the difference), decorative scissors.
- A way to write the names — a printer (using a font consistent with your invitations), a calligraphy pen, or ready-made name stickers. If you're handwriting them, consider hiring a calligrapher—your hand will thank you after 100+ cards.
- Decorations — ribbon, jute twine, dried flowers, a custom stamp, wax seals, or small sprigs.
- Glue, double-sided tape, a hole punch — for assembly and attaching decorations.
The Steps
- Decide on the format and design. A standard tent card is about 9 × 5 cm, while a flat card is around 8.5 × 5.5 cm. Make one test card before you start the full batch.
- Prepare your guest list. It's best to use the exact same list you're using for your seating chart—the order and spelling must match. Exporting the guest list from your RSVP system will save you hours of typing.
- Print or write the names. Stick to one font and size. Double-check any special characters or accents—this is a common printing mistake.
- Cut and fold the cards. Score them along a ruler to ensure the "tent" stands up straight.
- Add your decorations. A ribbon, a sprig, a wax seal—whatever ties the place card into your venue's styling.
- Sort them by table. Pack the place cards into envelopes or bags labelled with the table number. This will help the venue staff set them out in no time.
- Make 5–10% extra blank cards. Last-minute seating changes always happen.
What to Write on a Place Card: Names and Etiquette
The text on a place card is brief, but there are a few rules. The most important thing: the guest's first and last name, written clearly and correctly.
- Name format. For an elegant wedding, use the full name: "Anna Smith", not "Annie". For a more informal reception, a first name (e.g., "Anna") is fine, as long as you don't have two guests with the same first name at one table.
- Titles. For very formal weddings, you might use "Mr/Mrs/Ms": "Ms Anna Smith". At modern, relaxed receptions, titles are often omitted—the key is to be consistent across all place cards.
- Couples and plus-ones. Every adult guest gets their own place card, even if they're married. Don't combine two people on one card ("Mr & Mrs Smith") for a seated meal—these are their individual seats.
- Children. Children should have their own place cards too. It makes them feel included, and it lets the staff know where to serve a child's portion.
- Professional or academic titles. Generally, leave these off. A place card isn't a business card—"Dr.", "Prof.", or "Rev." can be omitted, unless family tradition dictates otherwise.
The golden rule of etiquette: the spelling must be perfect. A typo in a guest's name is a mistake they will notice immediately. Check your list twice, preferably with a second pair of eyes.
Place Card Designs and Ideas
There's a ton of inspiration out there. Here are a few styles that work well and are easy to match to your wedding theme:
- Minimalist. White or cream cardstock, a black serif font, maybe a thin gold line. It's timeless and suits any style.
- Greenery / Boho. A name set against a sprig of eucalyptus or an olive branch, on eco-friendly paper tied with jute twine.
- Glamour. Navy, bottle green, or burgundy card with gold or silver foil stamping (hot stamping). A stunning choice for evening receptions.
- Rustic. A slice of wood, a smooth stone with a name written on it, or cardstock with a wood-grain print, finished with burlap and dried flowers.
- Watercolour. Soft, painted backgrounds in your theme colours—perfect for spring and summer weddings.
- Functional 2-in-1. A place card combined with a menu or a QR code for your photo gallery—fewer items on the table, more practicality.
Top tip: keep your place cards, invitations, menus, and seating chart consistent. A cohesive stationery suite looks far more premium than the sum of its parts.
How Many Place Cards to Make and How to Plan
The number of place cards you need is the number of adult guests plus any children who have a seat at a table—so, exactly the number of people with an assigned place. On top of that, add a buffer:
- +5–10% extra for last-minute changes and any handwriting mistakes.
- Separate place cards for vendors like your photographer or band members, if they're eating in the main room.
- The top table—you'll need place cards too, unless you have a separate "Mr & Mrs" sign.
The order of operations is important. You should only make the place cards after you've finalised the seating chart, usually 2–4 weeks before the wedding when the layout is confirmed. Making them any earlier often means printing them twice—one guest cancellation can throw off the whole arrangement.
A practical workflow:
- Finalise your seating arrangements in your seating chart tool (after the RSVP deadline).
- Export the final list of names, sorted by table.
- Make the place cards based on this list, keeping them organised by table.
- Pack them into envelopes labelled with the table number and hand them over to your venue coordinator.
If you're using a digital tool to create your seating plan, the list of names assigned to tables is ready to download. Use a free seating chart tool to avoid typing everything out by hand.
How Place Cards Connect to Your Seating Plan
The place card is the physical finale of the entire seating process. The chain of events looks like this:
RSVP → Seating Chart → Table Numbers → Welcome Board/Chart → Place Card at the Setting.
Each element builds on the last. If the information is inconsistent at any stage—for example, a different spelling of a name on the chart and the place card—it creates chaos. That's why it's crucial to have a single source of truth: one master guest list that you use to create the seating plan, table numbers, and place cards.
This is where linking your seating chart to your RSVP list really helps. In souveil, when a guest confirms their attendance, they provide their name, dietary needs, and plus-one's details. This information flows directly into the seating chart, and from there, to your place cards. You can also add a QR code to your photo gallery on the card, so as soon as a guest finds their seat, they know where to upload their photos. Less typing, fewer typos, and one seamless experience from the invitation to the shared album.
Frequently Asked Questions
What's the difference between a place card and a seating chart?
A place card is a small card with a name on it, placed at an individual guest's seat. A seating chart is the large display at the entrance to the reception. The chart directs a guest to the correct table, while the place card shows them their specific chair at that table. The two work together and are based on the same guest list.
Are place cards necessary at a wedding?
For weddings with 50 or more guests, place cards are highly recommended as they help organise seating and make the meal service run smoothly. For a small, intimate reception of 20–30 guests, you can often skip them, as everyone knows each other and can seat themselves. It's a matter of scale and style, not a strict requirement.
What should you write on a wedding place card?
You should write the guest's first and last name, clearly and without any spelling errors. For a formal wedding, use their full name ("Anna Smith"), while for a more casual event, a first name is usually sufficient. Every adult and child should get their own place card—don't combine couples onto a single card for a seated meal.
How many place cards should you prepare for a wedding?
You need one for every person with an assigned seat—that's the number of adult guests plus any children sitting at the tables. On top of that, add a 5–10% buffer for last-minute changes and mistakes, plus separate cards for any vendors (like your band or photographer) who will be eating in the reception room. The top table needs place cards, too.
When should you make place cards—before or after the seating chart?
You should only make your place cards after the seating chart is finalised, typically 2–4 weeks before the wedding when the guest list is confirmed. Making them earlier is risky, as a single guest cancellation can change the entire seating arrangement, forcing you to reprint them. Finalise the seating plan first, then write out the names on the cards.
Making place cards and a seating plan? With souveil, your seating chart links to your RSVP list, and you can add a QR code to your photo gallery right on the place card—so guests know where to sit and where to share their photos instantly.